Showing posts with label DIY fashion. Show all posts

Saturday, April 10, 2010

Featured on Ladylike.com!

Big thanks to Lady Patricia over at Lady Like for featuring my recent DIY headbands!

Check it out HERE :) 

Here's the step-by-step for a rainy day: 

Step 1: Measure the elastic around your head while leaving at least half a centimetre or so extra once you cut it, so that the head band isn't cutting circulation off anywhere...


Step 2: Sew both ends of the elastic securely and trim off any unfinished threads.  (Excuse the chipped nail polish)


Step 3: Take the zipper and remove the mini staple (if any). Un-zip it approximately 3/4's of the way down, and fold the opposite ends as pictured. 
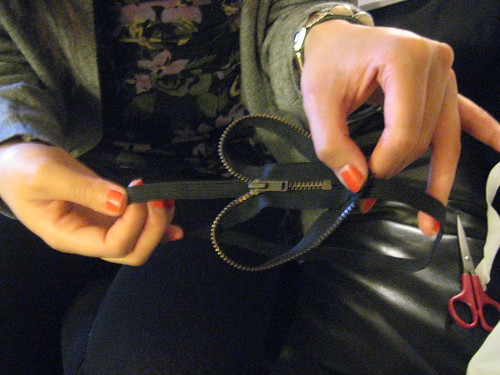


Step 4: Once you have sewn the ends of the zipper down, sew the zipper piece onto the elastic wherever you please. I would suggest to sew the heart piece directly above where you sewed the elastic ends together to end up with a flawless, cheap&chic, headband. 

Thursday, March 18, 2010

Sunny Day & Candace Ang headbands


blazer & shoes: Thrift, top: Zara, jeans: Nudie

Where to start? It's a beautiful day in the neighbourhood. Warm enough at least, to go out with just a blazer. I really like playing with androgynous looks -- although what I wear is considered "androgynous lite", I love pairing menswear inspired trousers, jackets, or shoes with (or without) girlier pieces. Actually, I prefer masculine styles made for women, and will choose those pieces over the girlier ones. The shoes I'm wearing in the photo were a recent thrift purchase. I found those at my fave Value Village with absolutely no wear on the soles.

As for my recent DIY project in the mix, I spotted these cute headbands at Holt Renfrew last summer in a variety of colours and styles. I tried one on and instantly fell in love. However, that faded quickly once I realized these headbands were retailing for $60.00 each. Not justifiable whatsoever.


My BFF, who was with me in Holt's at the time, came up with the idea that we should just make these ourselves. Actually having the spare time this week, I picked up some supplies and decided to try it out.

My total cost for supplies: $3.00. Here's the finished product!


I rushed to get this one finished because I got really excited about how it turned out! The zipper part almost looks navy in this light, but in person it's pure black. Pretty cool if I do say so myself.

*BALENCIAGA UPDATE: I made going to check out dyes one of my goals for this week. Didn't happen. Fiona Jackson (Life Coach) would not be impressed. This weekend for sure!

Friday, March 12, 2010

ITCHING TO DYE


Meet my lovely Balenciaga '07 Ivory First. She's a cream/bone coloured beauty with absolutely NOTHING wrong with her -- except, that she isn't getting out a lot. I really want to get more use out of this item, as it's such a beautiful purse. The leather is soft and supple, and that's probably what's making me hesitate the most. After I dye this baby, there's no going back...

I've had a lot success with dyeing a Work black (see featured posts!), and the leather is still going strong. This time, however, I want to dye it a vibrant color, which I think is a bit more riskier as penetrating dyes in colours other than black and brown are seriously hard to come by. I'm leaning more towards an electric blue, but with all the choices that Tarrago dyes has to offer, I'm lost!


I'm thinking that the color named 'Daphne' should yield the results I'm hoping for...


I DIE. This blue is too much for me to handle. If my end-result even resembled this blue in the slightest, I would be more than happy.

Stay tuned!

Monday, January 18, 2010

meOW

blazer: Thrift > DIY, shirt: Wilfred, shoes: Thrift

Feeling ......... let's just say I was rushed for this photo.

The makeshift vest I'm wearing is a 'special' piece. I'm filing this under DIY, as it became just that. Not intentionally. It was actually a broad-shouldered (a la '90s) blazer that may have had equally unflattering pants to go with it, in another life. After wearing it maybe once because I was so self-conscious of the awful-fitting shoulder pads, I decided to try and alter it. I am an amateur-- at best-- with the sewing machine, so I try to avoid using it as much as possible. At first, thinking maybe by removing the built-in shoulder pads altogether, I may be able to salvage it as a blazer. This was not the case, and with my results I wanted to just trash the thing. Then, weeks later, I came across a photo of Nicole Richie with Mary Kate in a silk vest dress (le sigh, couldn't find a better photo of it!).


This concept inspired me to turn my hideous mess of a blazer into a vest, and moments later I was cutting off the sleeves, and sewing (by hand, obvi) the lining and the unfinished hem toghether.


I wish I could show off my sewing job, but black on black is impossible to capture on my camera!

Tuesday, January 12, 2010

The finished product


Although, I've been wearing the bag in past photos, I thought it might make a difference to show just how amazing the leather looks up close! These are photos taken post-conditioning process. I think it really made a difference in terms of softening out the leather, as it was almost 'sticky' with just the dye alone. All-in-all I'm pretty happy on how it turned out!

I started this thread on The Purse Forum, where you can follow my progress as well as can see the extra input and support from the great ladies of tPF! You can view threads on practically any high-end purse label, and learn EVERYTHING there is to know about bags.

Tuesday, January 5, 2010

Balenciaga '07 Work Restoration Project - Part II


Stage 2 (finally!) with photos. I have to say, once all the old dye was stripped off, the blotchy leather reminded me of Alexander Wang's '09 Brenda bags. Call me crazy, but I actually thought it didn't look that bad..... Nonetheless, I stuck to my plans to go ahead with the dyeing process. Oh yeah, and that's masking tape on the hardware because I could not imagine the headache it would have been removing dye from the perforated studs!

Monday, December 28, 2009

Balenciaga '07 Work Restoration Project - Part I

Although probably the most time consuming project I have ever completed, it was definitely the most fun. It all started when I was scrounging the Vancouver listings on craigslist.com when I came across a post titled "USED Balenciaga Work - $150". The price was definitely what drew me in, so when I clicked the post to view more details, I was disappointed to find no pictures. The post simply said:

"Up for sale is a seriously used Work. Minor defects/damages. Still interested? E-mail me."

I was obviously still intrigued so I e-mailed the seller. If it ended up being a junker, then that was fine with me. No loss, right? But when I got her reply avec photos, that was really not the case. What I saw was a fixer-upper that just needed a little TLC (see below).


Ok, maybe a LOT of TLC! It turns out that this bag was originally an '07 Natural, of which the previous owner (attempted) to dye black). While the hardware is in great condition, the old dye is peeling and cracking in areas of wear. That didn't stop me anyway from buying it. To complete my restoration project I had to:
  1. Strip off the old dye using acetone (I was hesitant to do this, as I was scared the leather may not be able to hold up).
  2. Moisturize the leather before applying any coats of dye.
  3. Apply 2 coats of 'penetrating' dye by Fiebings (the old dye that appears on the bag was probably a self-shine dye that only held to the surface of the leather).
  4. Finish with 2 coats of Tarrago self-shine dye (the Fiebings dye left a bronze tone, and I used the Tarrago dye to get a true black and seal the penetrating dye).
  5. Lastly, moisturize again using products from Lovin' My Bags (I have not done this yet, as I've yet to receive the stuff I ordered!).
Part II is on the way!